This is default featured slide 1 title

Go to Blogger edit html and find these sentences.Now replace these sentences with your own descriptions.

This is default featured slide 2 title

Go to Blogger edit html and find these sentences.Now replace these sentences with your own descriptions.

This is default featured slide 3 title

Go to Blogger edit html and find these sentences.Now replace these sentences with your own descriptions.

This is default featured slide 4 title

Go to Blogger edit html and find these sentences.Now replace these sentences with your own descriptions.

This is default featured slide 5 title

Go to Blogger edit html and find these sentences.Now replace these sentences with your own descriptions.

!--Start of Tawk.to Script-->

Hide IP Address Online To maintain your Privacy

Every computer on the Internet has a unique IP address allotted to it which makes it possible to trace it back to its exact location. Even though the concept of Internet Protocol address has been designed for its transparency and traceability, in some cases this questions the privacy of the Internet user where one would not like to reveal his/her identity to the outside world. Well, if you are one such person who is in search of ways to hide your IP address online, then you are at the right place. 


In this post, I will discuss some of the easy and popular ways to hide your IP address, so that your identity and privacy is kept safe.

One of the most popular and easy ways to hide your IP address online is to use a proxy server.

In simple words, a proxy server is any server that will act as an intermediary between your computer and the Internet. Instead of communicating directly with the websites or Internet resources, here you communicate with the proxy server which then forwards all your requests to the remote server so as to establish a back and forth communication between your computer and the Internet. So, whenever you are hiding behind a proxy, the Internet or the websites you visit will only see the IP address of the proxy server, so that your real IP address is kept hidden.


Types of Web Proxies

Here is a list of different types of web proxies that you can try:


Website Based Proxy Servers:

This is the simplest of all methods. There are many websites on the Internet that provide free and paid proxy service for the users without having to install any piece of software program on their computer. The following are some of the popular websites that offer proxy service:


The above websites provide a field to enter the URL of the target website that you want to visit anonymously. Once you submit, they will establish a connection with the target site and presents you back with the intended page that you are trying to browse. The downside of using these free services is that, some of them will not offer a secured connection (SSL) and you will often be presented with annoying ads and pop-ups during the course of your browsing. However, you can avoid these by becoming a paid user.


Browser Configured Proxy Servers:

There are hundreds of freely available open proxies that can be found on the Internet. You can obtain the IP address of one of those freely available proxy servers and configure your browser to start using them. However, as they are openly available to public, most of them are either bottlenecked or perform too slow on normal conditions.


Program Based Proxy Servers:

A program based proxy server requires you to install a program on your computer and configure its settings. These provide you with an option to start hiding your IP address with just a click of a button. They automatically connect your computer to a private high speed anonymous proxy server to provide best performance. You also have the option to choose proxies based on location such as countries. The advantage of using this type of proxy is that, it is not limited to a single browser. That means, your computer’s entire web traffic is routed through the proxy, there by guaranteeing you with a highest level of privacy.

Most of these programs come with a free trial where you are required to pay once the trial period expires. The following are some of the popular program based web proxies:


VPN Services:

VPN services provide reliable ways not only to hide your IP address but also to protect your data and identity over the Internet. Here are a few examples of VPN services that you can try:


These are some ways through which you can Protect your Online Privacy by Hiding your IP...

How to Block or Disable autorun.inf File in Windows XP, 7

To disable the Autorun functionality in Windows XP, in Windows Server 2003, or in Windows 2000, you must have Security update 950582, update 967715, or update 953252 installed.


Simple way to disable autorun.inf :
Download the msi file by Clicking here
or from this link :- http://go.microsoft.com/?linkid=9741395

Fix it yourself-Manually disabling the autorun feature:

To disable Autorun yourself on operating systems that do not include Gpedit.msc, follow these steps:

Step1: Click Start, click Run, type regedit in the Open box, and then click OK.


Step 2: Locate and then click the following entry in the registry:

HKEY_CURRENT_USER\SOFTWARE\Microsoft\Windows\CurrentVersion\policies\Explorer\NoDrive


Step 3: TypeAutorun

Step 4: Right-click NoDriveTypeAutoRun, and then click Modify.

Step 5: In the Value data box, type 0xFF to disable all types of drives. Or, to selectively disable specific drives, use a different value as described in the “How to selectively disable specific Autorun features” section.

Step 6: Click OK, and then exit Registry Editor.

Step 7: Restart the computer.

you can re-enable the autorun feature :
Follow this link:

http://go.microsoft.com/?linkid=9743275

Actually i get this information from here:

http://support.microsoft.com/kb/967715

have phunn>>>>>

How to change Manufacturer Name of your Computer

Step 1: Create your logo image (if you don’t already have one) and put it in the following system folder:
 C:\Windows\System32\oobe\your-logo.bmp


NOTE: You could put it anywhere, I suppose, and path to it accordingly, but the current OEM logo is probably here, and I prefer to be consistent with system files.
The logo must be in the .bmp format and should be 120×120. Larger images will be automatically sized accordingly (and sometimes appear rather distorted).

Step 2: Back up your system registry.

Step 3: Run regedit and navigate to the following registry path:
HKEY_LOCAL_MACHINE\SOFTWARE\Microsoft\Windows\CurrentVersion\OEMInformation

Step 4: If your computer is an OEM product, look for the two string values Logo and Manufacturer in the right panel. If it isn’t, you’ll have to create those two new string values. To do so, right-click onOEMInformation -> New -> String Value -> Logo. (Repeat for Manufacturer.)


Step 5: Right-click on the string value, select Modify, and enter the updated information for each value.

Step 6: In the Windows System Properties panel, you’ll now see your updated personal information.

Disclaimer: Only for educational purposes!

Add/Pin Recycle Bin and various useful System Shortcuts to Windows 7/8/8.1 Taskbar


Windows 7, 8 and 8.1 allow you to add or pin your favorite to Taskbar so that you can access them more quickly and simple whenever you using your computer.
There’re many different ways to do this so we’ll learn how to ADD/PIN Recycle Bin and various useful System shortcuts like: Control Panel, My Computer,Programs and Features, etc to Windows 7, 8 and 8.1 Taskbar.


I will show you an example is: How to ADD/PIN Recycle Bin to Windows Taskbar and the same with each others.

Step 1: First you’ll need to create a new shortcut. To do this, right-click on Desktop and select “New -> Shortcut


Step 2: That opens the Create Shortcut window below where you type explorer.exe shell:RecycleBinFolder for the location. Then click Next:


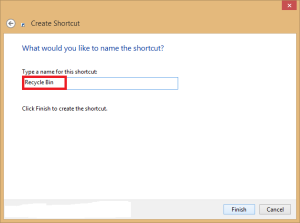
Step 3: Name it, type: Recycle Bin for the shortcut’s title. Click Finish to close the Create Shortcut window.


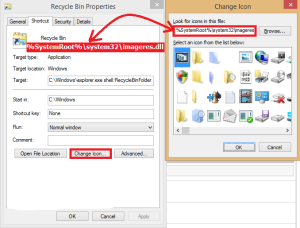
Step 4: Now you should have a second Recycle Bin shortcut on your desktop. However, it will not have the Recycle Bin icon. You can add one by right-clicking the shortcut, and selecting Properties to open the Recycle Bin Properties window. Then you select the Change Icon option to open the window below. 
There type SystemRoot%\system32\imageres.dll in the field “Look for icons in this file“, if not, copy %SystemRoot%\system32\imageres.dll to this field then click OK, all Icons will showing. 

Then you should be able to find a couple of Recycle Bin icons. One is an empty Recycle Bin, and the other is one filled with paper. Select either icon, and click OK. Click Apply and OK to close theChange Icon window. Then your desktop shortcut should also have a Recycle Bin icon.


Step 5: Now add the new Recycle Bin to the taskbar. You can drag and drop it from the desktop to the taskbar, or right-click the shortcut and select Pin to Taskbar. Either way, you’ll have aRecycle Bin shortcut pinned on the Windows 7, 8, and 8.1 taskbar.

It’ll launch “Create Shortcut” wizard. Now you’ll need to enter the command to open desired system shortcut. You can use any of following commands to create the desired shortcut:

Quote:explorer shell:MyComputerFolder (for My Computer shortcut)
explorer shell:RecycleBinFolder (for Recycle Bin shortcut)
explorer shell:ControlPanelFolder (for Control Panel shortcut)
explorer shell:Administrative Tools (for Administrative Tools shortcut)
explorer shell:ChangeRemoveProgramsFolder (for Programs and Features shortcut)
explorer shell:NetworkPlacesFolder (for Network shortcut)
explorer shell:Favorites (for Favorites shortcut)
explorer shell:HomegroupFolder (for Homegroup shortcut)
explorer shell:Games (for Games shortcut)
explorer shell:Fonts (for Fonts shortcut)
explorer shell:UserProfiles (for Users folder shortcut)
explorer shell:Profile (for your username folder shortcut)
explorer shell:Public (for Public folder shortcut)
explorer shell:My Documents (for Documents shortcut)
explorer shell:Common Documents (for Public Documents shortcut)
explorer shell:My Music (for Music folder shortcut)
explorer shell:CommonMusic (for Public Music folder shortcut)
explorer shell:My Pictures (for Pictures folder shortcut)
explorer shell:CommonPictures (for Public Pictures folder shortcut)
explorer shell:My Video (for Videos folder shortcut)
explorer shell:CommonVideo (for Public Videos folder shortcut)
explorer shell:Downloads (for Downloads folder shortcut)
explorer shell:CommonDownloads (for Public Downloads folder shortcut)
explorer shell:::{3080F90E-D7AD-11D9-BD98-0000947B0257} (for Flip 3D or Window Switcher shortcut)
Done, enjoy!!!

10 Handy Registry Settings for System Administration


Here’s a (seemingly) random collection of registry settings which I have recently encountered that you may find useful. Hopefully there’s one or more that you may not be aware of.


1. Enable Unsolicited Remote Assist

Unsolicited remote assist is very handy for troubleshooting problems on a remote computer where you don’t have some other form of remote control such as VNC. I’ve found that enabling it through the UI doesn’t always allow it to work, and you get some cryptic errors. These settings seem to really get it going.

HKEY_LOCAL_MACHINE\SOFTWARE\Policies\Microsoft\Windows NT\Terminal Services
fAllowUnsolicited = 1
fAllowUnsolicitedFullControl = 1
HKEY_LOCAL_MACHINE\SYSTEM\CurrentControlSet\Control\Terminal Server
AllowTSConnections = 1
fDenyTSConnections = 0
fAllowToGetHelp = 1

2. Increase Desktop Heap

Sometimes opening a lot of windows or tabs in Internet Explorer pushes use of the heap (a section of memory used by the desktop.) When you bump up against the limit, strange things start to happen. This blog post details a way to increase it which gives you more headroom. Just visit this link.

This link

3. Allow Popups on Secure Sites

Internet Explorer’s popup blocker is pretty handy most of the time. But when you’re connected to a secure web site you may want it disabled because the popups are part of the user interface for the site (such as for authentication.) This setting allows popups on HTTPS sites.

HKEY_CURRENT_USER\Software\Microsoft\Internet Explorer\New Windows
Allow HTTPS = 1

4. No LAN Manager Hashes

An oldie, but a goodie. This entry prevents the system from storing LAN Manager password hashes which are much less secure than Kerberos or NT hashes. Older systems such as Win 98 and ME won’t be able to authenticate, but that’s actually a benefit.

HKEY_LOCAL_MACHINE\System\CurrentControlSet\Control\LSA\Parameter
NoLMHash = 1

5. Disable Shaking

This one is a personal taste thing. I don’t like the shaking feature of Aero in Windows 7, I seem to activate it all the time on accident (perhaps I have muscle spasms.) Here’s a way to disable it.

HKEY_CURRENT_USER \ Software \ Microsoft \ Windows \ CurrentVersion \
Explorer \ Advanced
DisallowShaking = 1

6. Screen Saver Grace Period

The default setting for the grace period on requiring a password after the screen saver starts may be a bit too short for you.

HKEY_LOCAL_MACHINE\SOFTWARE\Microsoft\Windows NT\CurrentVersion\Winlogon\
ScreenSaverGracePeriod = (number of seconds)

7. Take Ownership Menu

This one isn’t as much of a registry setting as it is a shortcut, but it’s still handy. If you find yourself needing to take ownership of files a lot, this will be quicker than going through the security tab. It adds a menu item in Windows Explorer when you right click on a file or directory which will give you ownership.

HKEY_CLASSES_ROOT\*\shell\runas
(default) = “Take Ownership”
NoWorkingDirectory = (empty)
HKEY_CLASSES_ROOT\*\shell\runas\command
(default) = “cmd.exe /c takeown /f \”%1\” && icacls \”%1\” /grant administrators:F”
IsolatedCommand = “cmd.exe /c takeown /f \”%1\” && icacls \”%1\” /grant
administrators:F”
HKEY_CLASSES_ROOT\Directory\shell\runas
(default) = “Take Ownership”
NoWorkingDirectory = (empty)
HKEY_CLASSES_ROOT\Directory\shell\runas\command
(default) = “cmd.exe /c takeown /f \”%1\” /r /d y && icacls \”%1\” /grant
administrators:F /t”
IsolatedCommand = “cmd.exe /c takeown /f \”%1\” /r /d y && icacls \”%1\”
/grant administrators:F /t”

8. Disable Simple File Sharing

Simple file sharing in XP makes remote administration a bit difficult, mainly by disabling the admin shares (ADMIN$, C$, D$, etc.)

HKEY_LOCAL_MACHINE\SYSTEM\CurrentControlSet\Control\Lsaforceguest = 0

9. Disable Writing to USB Drives

This is a helpful security setting if your organization wants to disable writing to USB drives on certain machines.

HKEY_LOCAL_MACHINE\SYSTEM\CurrentControlSet\Control\StorageDevicePolicie
WriteProtect = 1

10. Default User Settings

This is more of a tip than a setting. If you need to restore a key in HKEY_CURRENT_USER to its default, you can find them all in HKEY_USERS\.DEFAULT. This is also handy if you want to change a setting that will be used for all new user accounts because it is used as a template for each new user’s registry settings.

have phunn!!!

Add Control Panel to Desktop Context Menu and Create Cascading Options

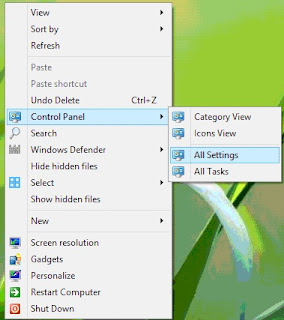
To revert any changes to your Windows, Control Panel is the first and foremost way. You can configure your Windows according to your need, by making changes in the settings for different settings under the hood of Control Panel. Today, in this article, I’ll show you, how you can access Control Panel straight from Desktopcontext menu in Windows 8.

Add Control Panel To Desktop Context Menu


Now here is the how to part. The trick just requires the basic knowledge of Registry Editor such as creating, editing etc. of registry keys. So here we go…

Add Control Panel to context menu and create cascading menu

Press Winkey + R combination, type regedit in Run-Dialog box and hit Enter to open the Registry Editor.

Navigate here:

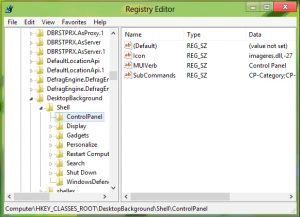
HKEY_CLASSES_ROOT\DesktopBackground\Shell


In the left pane of this location, create a subkey using Right Click -> New -> Key. Name it as ControlPanel. Moving on, in the right pane of this newly created subkey, create three strings with corresponding data:

MUIVerb : Control Panel

SubCommands : CP-Category;CP-Icons;|;CP-AllSettings;CP-AllTasks

Icon : imageres.dll,-27


Add Cascade Options
Now head on to following location:

HKEY_LOCAL_MACHINE\SOFTWARE\Microsoft\Windows\CurrentVersion\Explorer\CommandStore\shell


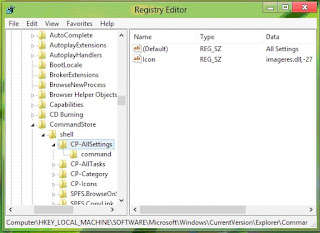
In the left pane of this location, create a subkey using Right Click -> New -> Key. Name it as CP-AllSettings. It will automatically create a Default string in the right pane, modify its Value data by All Settings. Now in the right pane of this location, create a string Icon with Value data asimageres.dll,-27.


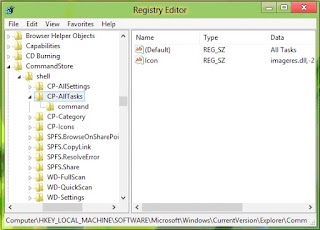
Follow this procedure, to create three more subkeys in the same location. Firstly name them as CP-Icons, CP-Category, CP-AllTasks. (See Screenshot)


Now modify Default strings of these so created subkeys by following Value data:

CP-Icons : Icons View

CP-Category : Category View

CP-AllTasks : All Tasks

Finally, create a string Icon with Value data as imageres.dll-27 in the right pane of each subkey independently.
Next, create the subkey of the key created in the step 5 i.e. CP-AllSettings using same procedure. Name it as command. In the right pane of command, edit the Value data of Defaultstring to 

explorer.exe shell:::{F90C627B-7280-45DB-BC26-CCE7BDD620A4}.

Similarly create subkeys of the subkeys create in step 5, i.e. CP-Icons, CP-CategoryCP-AllTasks and name them as commandeach.

In the right pane for each command subkey created, use following data:

For the subkey command of CP-Icons, edit the Default string in the right pane to explorer.exe shell:::{21EC2020-3AEA-1069-A2DD-08002B30309D}.

For the subkey command of CP-Category, edit the Default string in the right pane to explorer.exe shell:::{26EE0668-A00A-44D7-9371-BEB064C98683}.

For the subkey command of CP-AllTasks, edit the Default string in the right pane to explorer.exe shell:::{ED7BA470-8E54-465E-825C-99712043E01C}.

To save your time, you can use ready-made registry file to added the Control Panel option to context menu in few clicks. You can download it HERE.


That’s it. Now press Windows Key + D to access Desktop and then right click, and get access to Control Panel.

Have phunn!!!!

How to add Copy to and Move to Options under Right Click Menu


This is one of the coolest tricks for any windows OS to add a custom copy to and move to options under the right click menu for any files or folders.This will make easy whenever you want to move or copy any file of folder in your system. Now get rid of the usual copying or moving of files or folders by this trick. 


I am very much sure that this trick will help you a lot. All you have to do is to edit your registry and add a new sub-key. Don't worry if you are not well familiar with the registry, i will give you full instructions and any help if needed.I already posted a lot of registry hacks, you can access all that from Registry Tricks category if you are interested in studying that.

Ok, leave all that now we can start this trick, Follow the steps:
Step 1: Open Run Dialog box, type "regedit" without quotes and hit Enter.

Step 2: A registry editor window will be opened , now browse to the below key

HKEY_CLASSES_ROOT\*\shellex\ContextMenuHandlers

Step 3: Right click the "Context Menu Handlers" key and choose New->Key.
Step 4: Name the new key “Copy To” (without the quotes).
Repeat the above and create another new key named Move To

Step 5: Select the Copy To key and in the right hand pane, double click “Default”

Enter this clsid value as the value data:

{C2FBB630-2971-11d1-A18C-00C04FD75D13}

Next , select the Move To key and in the right hand pane set the default value to:

{C2FBB631-2971-11d1-A18C-00C04FD75D13}

And that's it you are done, 
now you can check this by right clicking any file ,you can see as below screenshot , there will be 2 new options


Now this is for files , we can give this to Folder Options also, Procedure is same but only the key is different. Follow the steps below:

Step 1: Browse to the following key

HKEY_CLASSES_ROOT\Directory\shellex\ContextMenuHandlers

Step 2: Right click ContextMenuHandlers and create a new key named Copy To. 
Right click it again and create another new key named Move To.

Step 3: 
left click on the right hand pane, add the same default values as you did for Files:

For Copy To:

{C2FBB630-2971-11d1-A18C-00C04FD75D13}

For the Move To:

{C2FBB631-2971-11d1-A18C-00C04FD75D13}

Exit the registry and you are done.

Now you can easily Copy or Move any file or folder with ease.
Hope you like it...

How to Add Recycle Bin, Run, Search and many other Shortcuts in My Computer


You can add useful shortcuts to My Computer for easy access.


Here is the trick, just follow the steps:

Step 1: Type regedit in RUN to open Registry Editor.

Step 2:  Navigate to the following key:

HKEY_LOCAL_MACHINE\SOFTWARE\Microsoft\Windows\CurrentVersion\Explorer\MyComputer\NameSpace

Step 3: Now right click on NameSpace and create a new key. Assign a name for this key as per your requirement from the following list (only the indicated red part) :
Code:

Recycle Bin – {645FF040-5081-101B-9F08-00AA002F954E}
Control Panel – {21EC2020-3AEA-1069-A2DD-08002B30309D}
Run – {2559A1F3-21D7-11D4-BDAF-00C04F60B9F0}
Search – {2559A1F0-21D7-11D4-BDAF-00C04F60B9F0}
Internet Explorer – {871C5380-42A0-1069-A2EA-08002B30309D}
Administrative Tools – {D20EA4E1-3957-11D2-A40B-0C5020524153}
Network Connections – {7007ACC7-3202-11D1-AAD2-00805FC1270E}
Printers – {2227A280-3AEA-1069-A2DE-08002B30309D}


Step 4: Changes will take effect immediately. 

Step 5: To block these entry to appear in My Computer, simply delete the key that you have created in Registry.

How to add your Name in Desktop Context Menu in Windows 7 and later


UPDATE: This tutorial will also work in Windows 8 and later OS versions.


You can add your name at top of the menu and can open any program, Explorer, Documents folder or User Accounts by clicking on it.

So here is the step-by-step guide:

Step 1 : Type regedit in RUN or Start Menu search box and press Enter. It’ll open Registry Editor.

Step 2 : Now go to:

HKEY_CLASSES_ROOT\DesktopBackground\Shell

Step 3 : Now we’ll need to create a new key under “Shell” key. Right-click on “Shell” key and select “New -> Key“. Give the new key any desired name e.g. “Name” (without quotes).

Step 4 : Now in right-side pane, change value of “Default” to your desired name which you want to show in Desktop context menu. We have chosen ~:: MANISH ::~ in our example.

Step 5 : Now right-click on the new key which we created in step 3, e.g. Name and select “New -> Key“. Give the new key name of command.

Step 6 : In right-side pane, change value of “Default” to explorer.exe if you want to open Explorer by clicking on it. We have chosen Control userpasswords to open User Accounts applet in our example.

Step 7 : To set an icon for the shortcut, select the key created in Step 3 and in right-side pane, create a new String value “Icon“. Set its value to your desired icon. We have set it to imageres.dll, 206 in our example.

To set its position in the context menu, create a new String value “Position” and set its value to:

We have set it at top.


Step 8 : That’s it. Now you can have your name with an icon in Desktop context menu.

PS. If you want a ready-made registry script to do the task automatically, then copy paste following code in Notepad and save the file with name “ANYTHING.REG” (including quotes).

Windows Registry Editor Version 5.00

[HKEY_CLASSES_ROOT\DesktopBackground\Shell\name]
@=”~:: MANISH ::~”
“Icon”=”imageres.dll,206”
“Position”=”Top”

[HKEY_CLASSES_ROOT\DesktopBackground\Shell\name\command]
@=”Control userpasswords”

Run the file and it’ll add the program shortcut in Desktop context menu.

To change the name, icon or associated application path,simply change the BOLD part in the script.

DONE…

Disable Win+X Shortcut Keys

Windows 7 and Vista have all the same Windows+X shortcut keys as other versions of Windows, such as Win+E for explorer and Win+D for the desktop, but adds in all of the Win+<num> keys to launch the shortcuts in the Vista Quick Launch menu (or switch to apps in Windows 7), as well as Win+X for mobility center, etc.

Download App 1

But what if you want to disable all these extra keys?

Manual Registry Hack

Just open up regedit.exe through the start menu search box and navigate to the following key (create if it doesn’t exist)

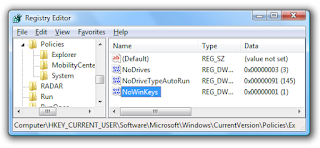
HKEY_CURRENT_USER\Software\Microsoft\Windows\CurrentVersion\Policies\Explorer


Create a 32-bit DWORD value called NoWinKeys and set the value to 1. You’ll need to log on and back off for the changes to take effect.

Make sure that you log off and back on in order for this change to take effect. You could also restart explorer.exe through task manager if you wanted.

That's it, Done....

How to Disable/Turn-Off Alt+F4 Options in Windows OS

To do that, You'll need to Open Registry editor, for that open Run(Win + R) and type : regedit


Open this :

REGEDIT->HKEY_CURRENT_USER->SOFTWARE->MICROSOFT->
WINDOWS->POLICIES->EXPLORER

Then go to right side and by right click of your mouse create new DWORD value with nameNoClose and after creating click on it and give Value Data 1.


And Reboot your PC..

Now your Turn Off option is disabled..


To Enable it again..

Go to that directory by regedit, and simply delete that created NoClose and Log Off Your User and Log in again..

Your Turn off Again Working.

How to remove Shortcut Arrows from Desktop icons

We all see a Shortcut Arrow on our shortcuts icons, Do you know that the arrows can be removed the shortcuts key...


Just follow the instructions as discussed below :


1. Perform instructions described under ‘Remove shortcut arrow from desktop icons’. For your convenience, steps 1 to 3 are reported here.

2. Perform instructions described under ‘Remove shortcut arrow from desktop icons (2)’. For your convenience, steps 4 and 5 are reported here.

3. And finally, do the same with conferencelinkdocshortcutinternetshortcut and wshfile.
So, here is a summary of all actions:

1. Start Registry Editor(regedit).

2. Navigate to HKEY_CLASSES_ROOT\lnkfile

3. Delete the IsShortcut registry value.

4. Navigate to HKEY_CLASSES_ROOT\piffile

5. Delete the IsShortcut registry value.

6. Navigate to HKEY_CLASSES_ROOT\ConferenceLink
7. Delete the IsShortcut registry value.
8. Navigate to HKEY_CLASSES_ROOT\DocShortCut

9. Delete the IsShortcut registry value.

10. Navigate to HKEY_CLASSES_ROOT\InternetShortcut

11. Delete the IsShortcut registry value.

12. Navigate to HKEY_CLASSES_ROOT\WSHFile

13. Delete the IsShortcut registry value.

14. Close regedit, and log off

Note : Please note that in some cases deactivating the arrow for *.LNK files might lead to duplicate items in the Explorer Context menu.

How to Disable Right Click on Desktop


If you want to disable your right click option in desktop,then there is a simple trick to do this editing your registry.This is so simple all you have to do is to create a new key,Ok lets start our trick.


1. Open Run ( window + r ) and type regedit.

2. Registry editor window will be opened and browse to the following key


HKEY_CURRENT_USER\Software\Microsoft\Windows\Curre ntVersion\Policies\Explorer 


3. Then in right side panel, right click to create a new DWORD value with the name

NoViewContextMenu (it is case sensitive), then assign number 1 in value data box.


4. Then exit the registry and restart your computer to effect the changes.
and that's it, you are done. Now you can't right click on the desktop.


Hope you like this tutorial, Feel free to for any help in comments...
 

Do you ever Shutdown your PC Properly ? Not sure : Check Now


This trick is actually to enable auto end tasks to the programs that will be either non responding or to end the programs that will cause delay in normal shutdow. 

This can be done by editing your registry keys.

Just follow these steps and and create a new key in your registry. 

You can either go to registry and add these keys manually or just create a reg file by directly copying this file to you notepad. This reg file automatically ends tasks and timeouts that prevent programs from shutting down and clears the Paging File on Exit.
1. Copy the following code into notepad.


[HKEY_LOCAL_MACHINE\SYSTEM\CurrentControlSet\Control\Session Manager\Memory Management]
“ClearPageFileAtShutdown”=dword:00000001

[HKEY_USERS\.DEFAULT\Control Panel\Desktop]
“AutoEndTasks”=”1”

[HKEY_LOCAL_MACHINE\SYSTEM\CurrentControlSet\Control]
“WaitToKillServiceTimeout”=”1000”


2. Save the file as shutdown.reg or *.reg

3. Double click the file to add into your registry. That's it, now you have added this auto end tasks key to your registry.

4. Once you've added this Registry Key, Whenever you Shutdown your PC all the Background running applications will be stopped.

I must prefer this to add, as it helps your PC to run smoothly☺☺

How To Write Protect USB Ports From Other Users


Usb drives are the most common and easy method of transfering data from one location to another.They include pen drives,removable hard disks etc….But if you want your sytem to be write protected so that no one can copy anything from your system with out your permission by blocking your usbports.There is simple registry hack to do this trick.Dont worry you dont need to have any advanced registry knowledge for doing this trick .Just exactly follow my instrucrions.

Ok now we can start our trick,

1. First thing you have to do is to open run ( window + r ) and type regedit

2. Now browse to the following section from your registry window

HKEY_LOCAL_MACHINE\SYSTEM\CurrentControlSet\Control

3. Make sure that you are in above specified path, then right click and add a new key and enter

“StorageDevicePolicies” without quotes.


If you succesfully completed step 3, then you can see StorageDevicePolicies on the right side panel. Ok now right click on that and add a new DWORD VALUE .and add its value as 1 (one)


Restart your computer to take effect.

Thats it you are done.Now all the USB Ports in your system is protected and no one can copy anything through usb.

If you like this post please pass your comments on this. All your feedbacks and advices are precious.